How to install WordPress | Step by Step Guide
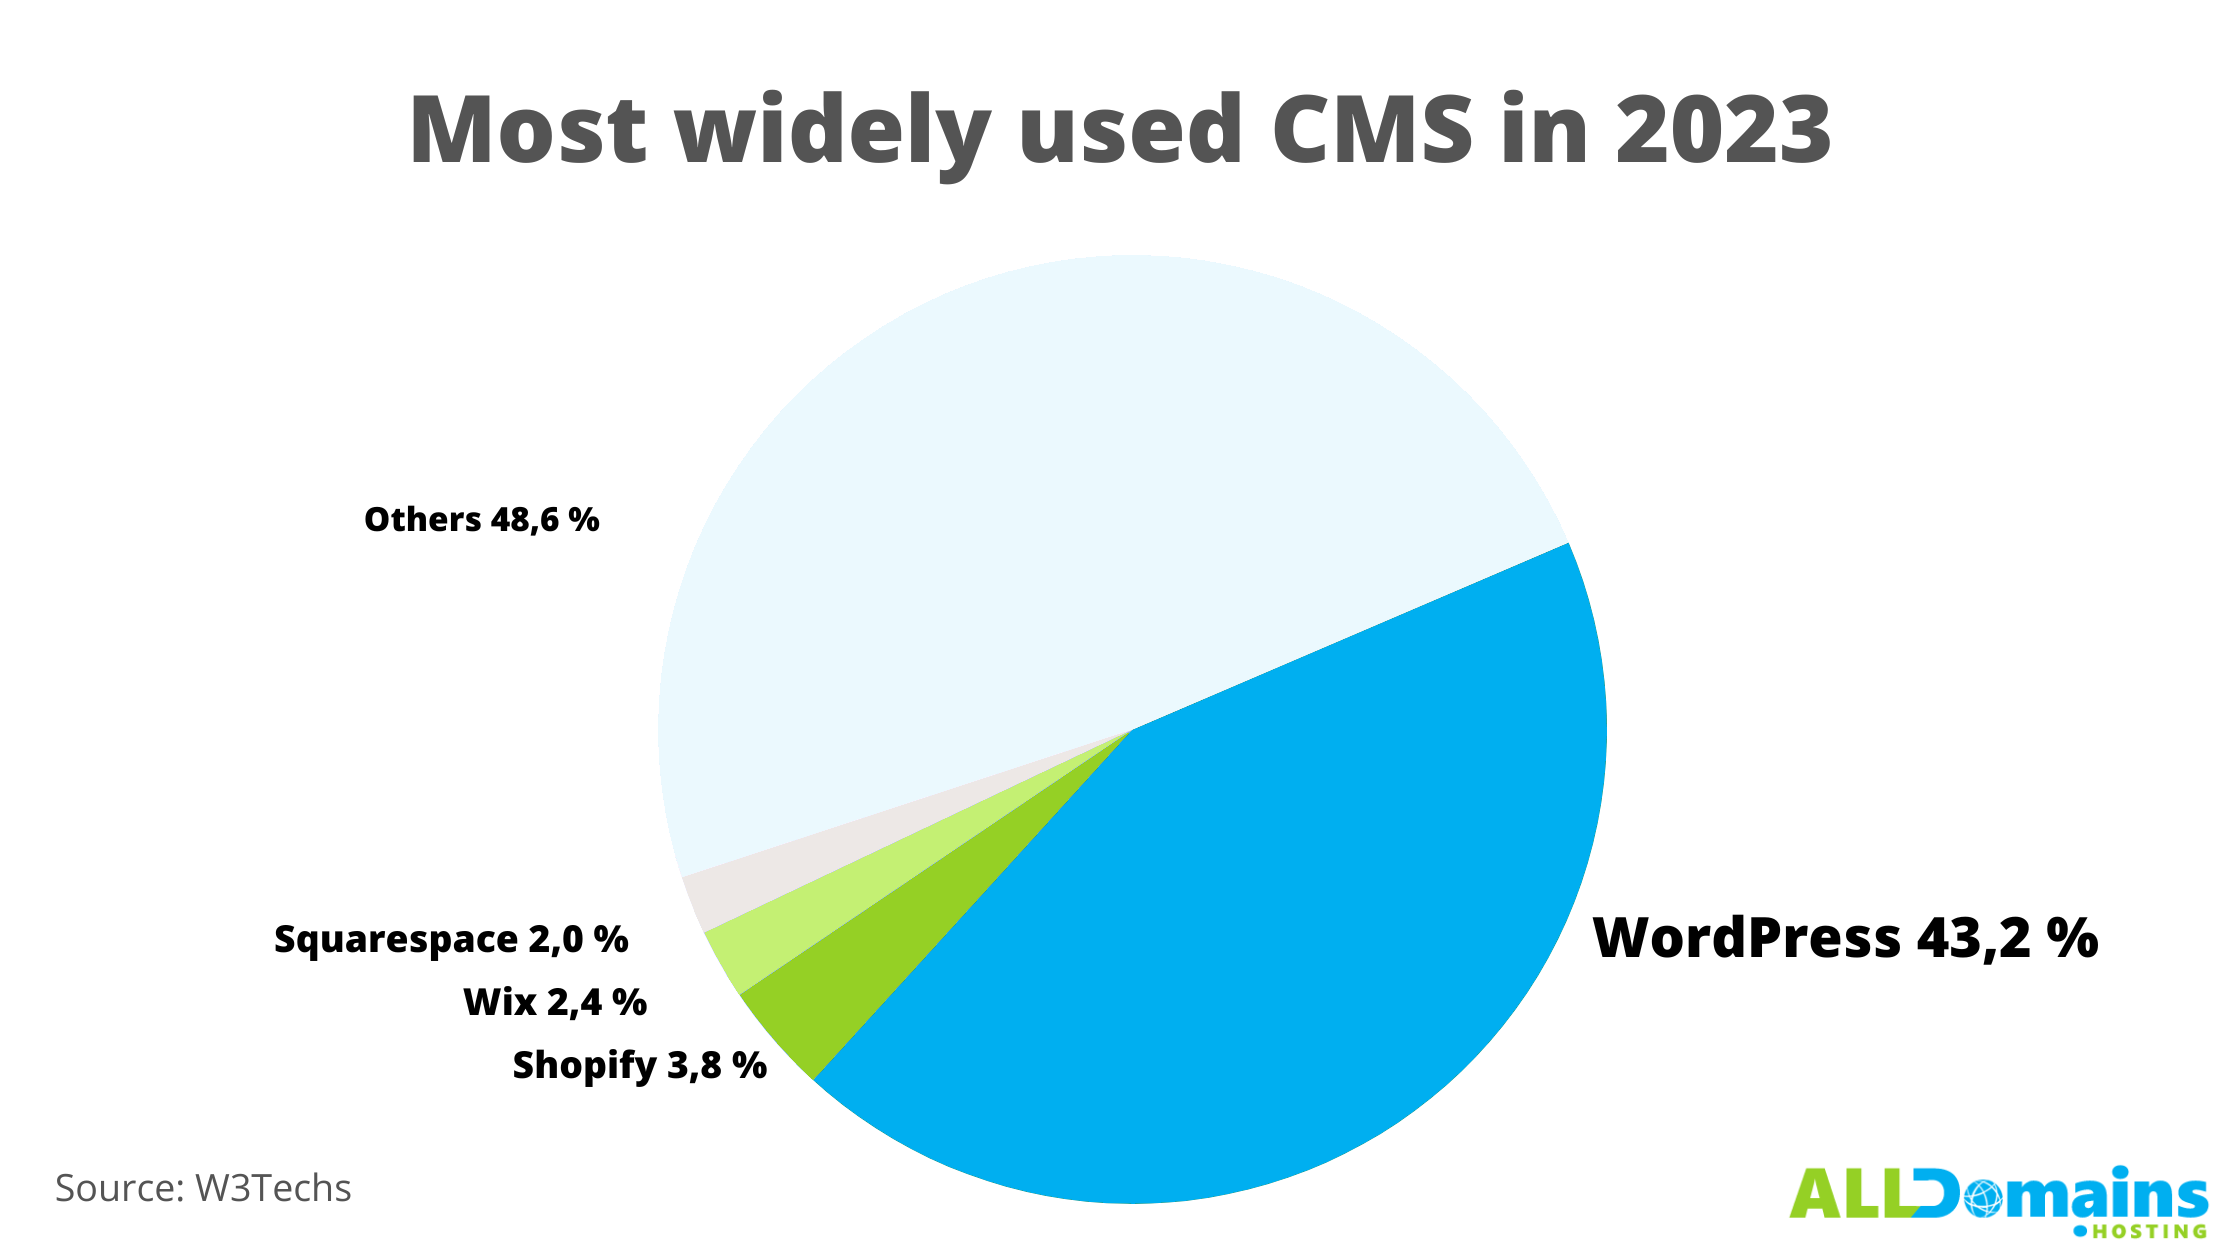
You want to create your website with WordPress? Good choice! The CMS enjoys great popularity. In 2023, the percentage of websites based on WordPress is 43%. The software continues to improve constantly and shows steady growth.
With this guide, even beginners can install the software. You will see: Installing WordPress is not impossible. We will show you step by step how to do it.
1. Preparation | What do I need to install WordPress?
Before you start with the installation, you need to do some preparations.
Domain and Web Hosting
To be able to use WordPress, you need a domain and web hosting. To make sure that your domain points to the hosting package, you need to check the DNS settings. Usually, if you order your domain and hosting package from the same provider, these settings will be set automatically.
SSL Certificate | HTTPS
Before you start using WordPress, you should definitely install an SSL certificate on your web hosting. With the SSL certificate, the transmission of data between the user and the server is encrypted.
If you set up the SSL certificate after installing WordPress, you will have to make manual changes to your website. This may cause problems.
Free SSL Certificate
Free Let's Encrypt SSL certificates are included in alldomains.hosting web hosting packages. You can install them in the control panel with just two clicks (module "SSL security" -> "Activate certificate").

2. WordPress Installation
Installation Methods
WordPress can be installed automatically or manually. Which method you choose is up to you.
Automatic Installation
The fastest and easiest method is the automatic installation with a software installer. alldomains.hosting provides this option for free.
The result of the automatic installation with our installer is identical to the manual installation. No additional plugins are installed and no presettings are made. WordPress is installed in just a few clicks.
With some other providers, additional plugins and themes are installed. If you do not need these, you should make sure to delete them. This optimises storage space and minimises security risks.
Manual Installation
The manual installation takes a little longer and is less suitable for beginners than the automatic installation with a software installer. In this guide, we will go through both variants step by step.
Automatic Installation with a Software Installer
Not much technical knowledge is required to do the installation with the software installer.
1. Open the Control Panel
You can find all the tools you need in the alldomains.hosting control panel. Here you can access the login page of your control panel.
2. Create a Database
First you have to create a database. This can be done easily in your control panel in the menu item "databases". There you select "Add new database".

Select MySQL and in the next step the latest MySQL version.
The name of the database could be “wordpress”.
The next step is to choose a secure password. It should be many characters long and contain numbers and special characters.
With a free password management programme such as KeePass, you can not only create secure passwords, but also manage them in one place.
Check the settings you have made and complete the creation of the database by clicking on "Next".
3. Install WordPress Software
Now you can start installing WordPress. Select the menu item "Software" in the control panel and click "Install".
Then select WordPress and the desired WordPress version. We recommend that you use the latest version.
Select the root directory (www/) as the installation path. Click on "Select" and then "Next".
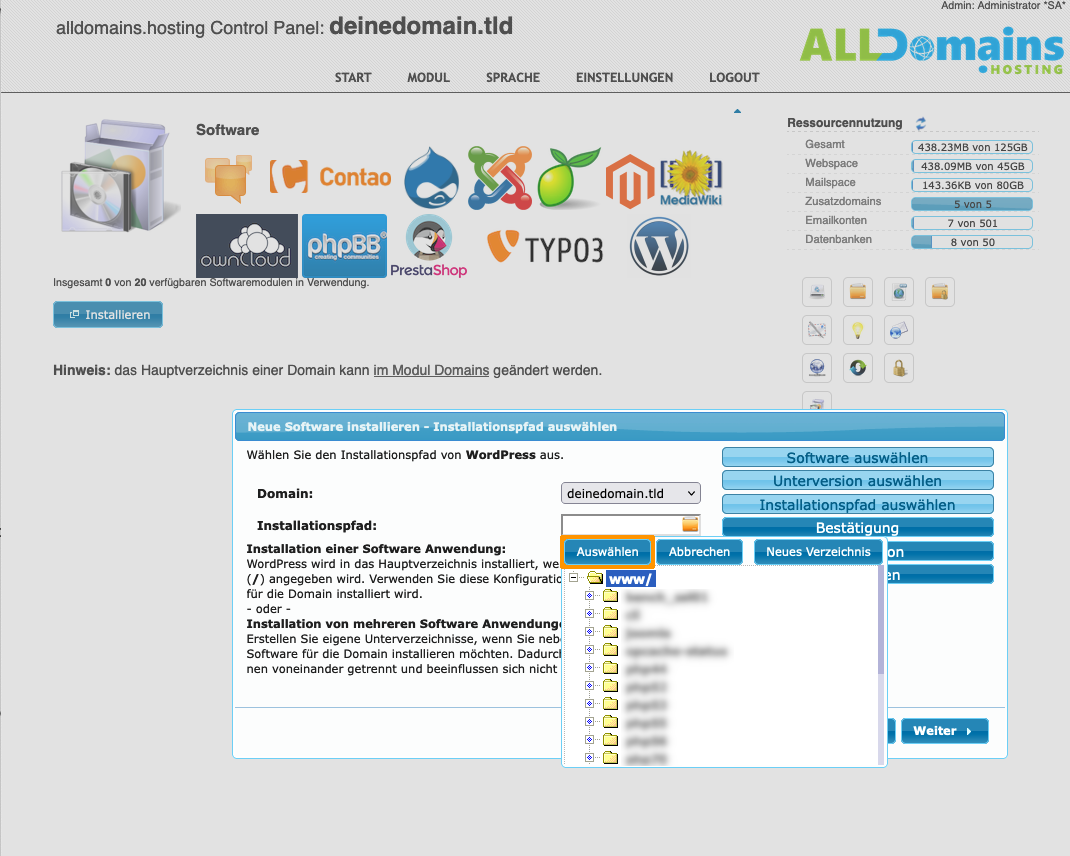
WordPress is thus installed in the root directory of the domain. The installation path is www/.
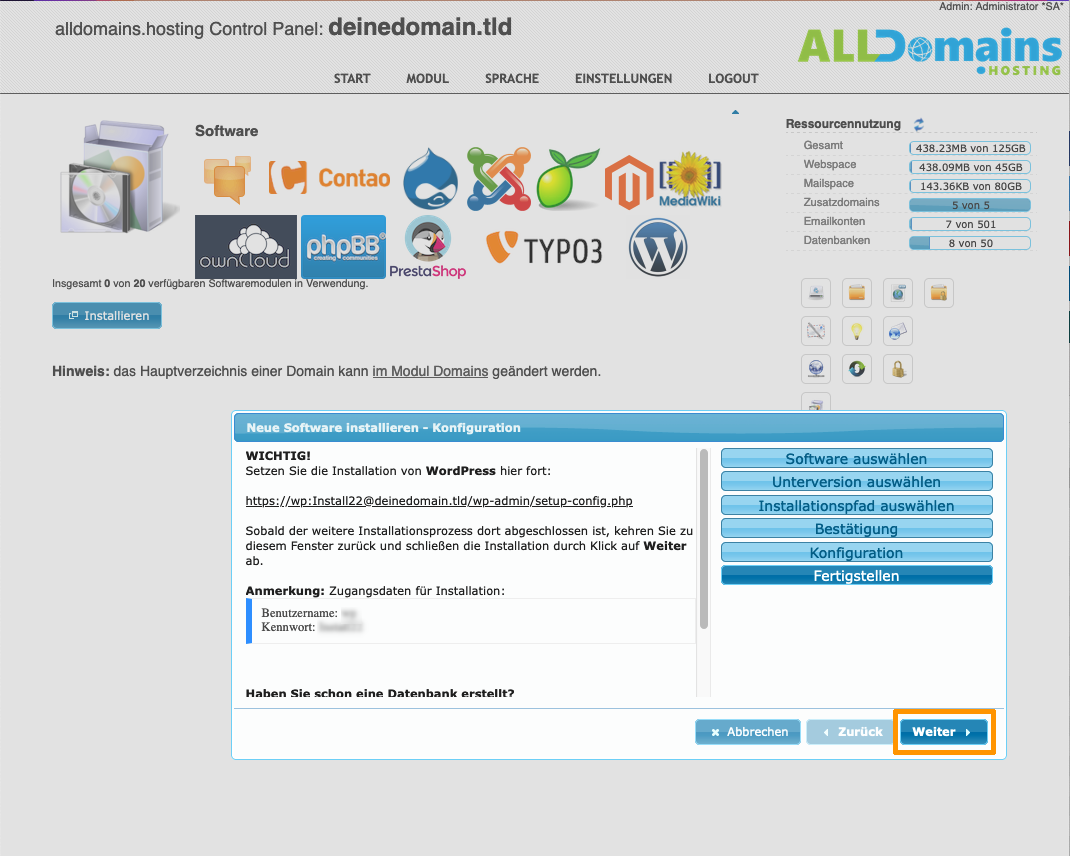
After confirming with a click on "Next" you continue with the further installation of WordPress in the browser. Open the link provided and continue there.
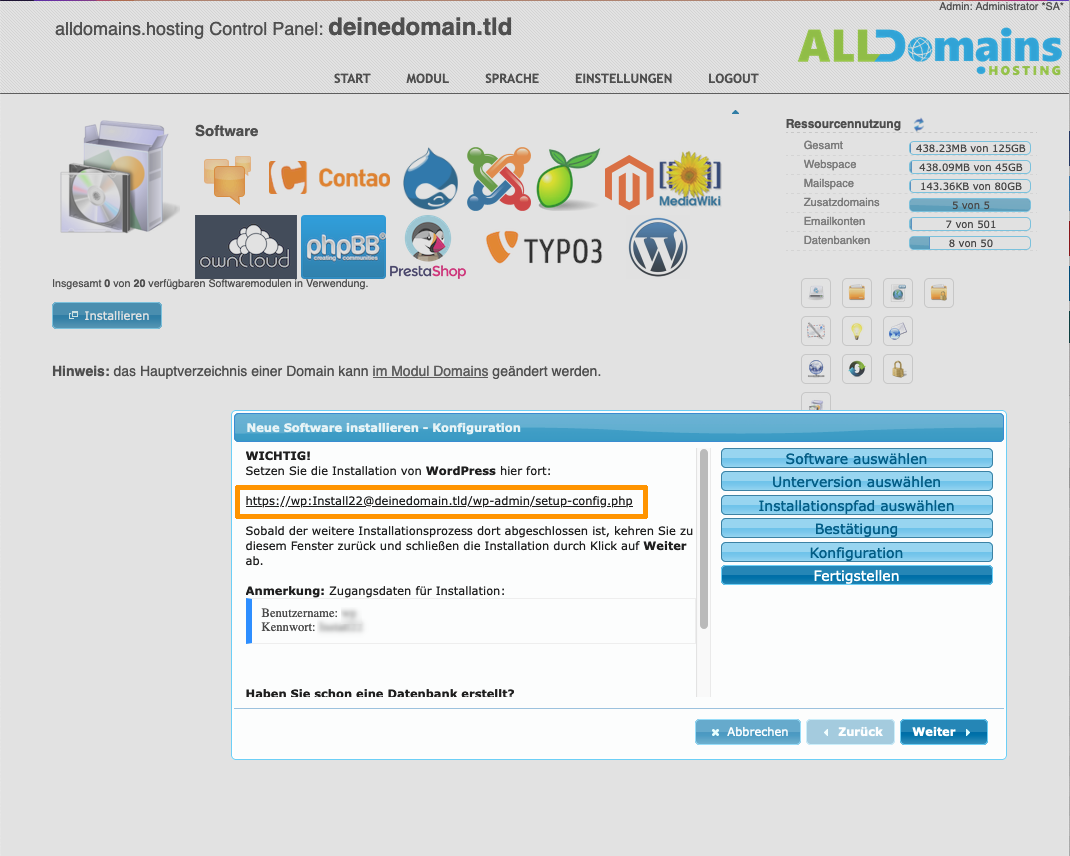
Note that we have secured the installation routine of WordPress with a password. If you open the further installation process directly via the link in the control panel, the username and password will be automatically applied. Just click "Ok". Otherwise you can find the password in the installation window in your control panel. The password protection is automatically deleted after the installation is completed and the wordpress installation is secured with a user.
Leave the browser tab with the control panel page open. After completing the further installation process in the browser, just click on "Next" here.
4. Setup in the Browser
After opening the link in the control panel, you will be directed to the WordPress setup page in your browser. Select the language you want to install WordPress in and continue.
Now you have to link the WordPress installation to the database you just created. Click on "Let's go!"
Enter the database name, the user name, the password and the database host. In the next step, we will show you where to find the login information in your control panel.
To better protect your database from attacks, you can choose a random combination of letters and numbers as table prefix, e.g. "ad7a03_". If you want to use multiple WordPress installations within one database, you have to give each installation its own table prefix.
You can find the required access data in the control panel module "Databases". Click on the previously created database and display the access data.
After you click on "Send", WordPress can already communicate with your database. Now select "Perform Installation".
Now all you have to do is choose the title of your website (you can change this later) and create your user account for the WordPress login.
To increase security, set a username other than "admin", because this is the first name that will be tried in brute force attacks.
Don't set a checkmark at "Prevent search engines from indexing your website" if you want Google & Co. to be able to index your website.
You can, however, check the box until your website is finished and the content is available. After that, you can still activate it for search engines. To do this, go to "Settings" -> "Read" -> "Visibility for search engines" in the backend and remove the tick.
Click on "Install WordPress" to complete the installation in the browser.
Go back to the control panel and close the installation wizard by clicking on "Next" and "Exit Wizard".
That's it! The software has been successfully installed. You can already log in to WordPress.
We'll show you the first steps you can now take in your WordPress backend further down in the article.
Manual Installation
1. Create a Database
First you need a database. You can create one in your control panel in the menu item "Databases". Click on "Add new database" and select MySQL as database system. Use the latest MySQL version unless you have a reason to use an older version (e.g. due to plugin compatibility).
Name the database e.g. "wp" or "wordpress" and set a secure password. You can also view or change the password later in your control panel.
2. Download and configure the Installation Files
Next go to the official WordPress website (https://de.wordpress.org/download/) and download the installation files: https://wordpress.org/download/
Extract these files locally on your computer (right click on the ZIP file -> "Extract all").
The unzipped files are now in a folder called "wordpress".
3. Upload WordPress Files to the Web Space
Connect to your server using FTP. You can use a programme like FileZilla. To log in, enter your FTP access data in the bar at the top. You can leave the field "Port" blank. On the left side you see the local files on your PC, on the right the files on the server.
You will receive the FTP access data by e-mail after you have ordered your hosting package. You will also find the server and user name in the control panel module "FTP Manager". It's possible to set a new password ("Action" -> "Set password") or create a new user there.
Open the "wordpress" folder and select all the files it contains. Drag and drop all files into the www directory, which is the root directory of your domain.
4. Start the Installation Process in the Browser
Open your WordPress installation. Simply open your domain in a browser with the installation path of WordPress. In our example that would simply be www.yourdomain.tld. You will be automatically redirected to https://www.yourdomain.tld/wp-admin/setup-config.php.
If we had installed WordPress in a subdirectory (www/subdirectory/), we would enter www.yourdomain.tld/subdirectory/ in the browser.
Click on "Let's go!". You will be taken to the input page for your database credentials.
Enter the access data for your previously created database. You can access them in the control panel in the "Databases" module. Click " Action" -> "Access data".
To better protect your database from attacks, you should change the value "Table prefix" to some random letters and numbers, e.g. "ad7a03_" . If you want to use multiple WordPress installations within one database, you have to give each installation its own table prefix.
In the next step, create a user account for the WordPress backend.
It's best to not name your user "admin" so your WordPress installation will be less vulnerable to brute force attacks.
Choose a secure password (not too short, upper and lower case letters, numbers, special characters etc.).
Do not check the box "Prevent search engines from indexing your website" if you want Google & Co. to be able to index your website. You can, however, check the box until your website is finished and the content is available. After that, you can still activate it for search engines. To do this, go to "Settings" -> "Read" -> "Visibility for search engines" in the backend and remove the tick.
Click on "Install WordPress" to successfully complete the installation! You can now log in to WordPress with the user account you just created. The URL to log in is: https://www.yourdomain.tld/wp-login.php
3. Installing WordPress in a Subdirectory
It is possible that you don't install WordPress in the main directory (www/) of your domain, but in a subdirectory (www/subdirectory/).
This can be an advantage if you want to install other applications on your webspace and gives you a good overview of your webspace.
However, you will have to make settings so that the subdirectory is not visible in the URL of your website ("www.yourdomain.tld/" instead of "www.yourdomain.tld/subdirectory/").
To install WordPress in a subdirectory, create a subfolder in the root directory (www/) of your domain. You can do this using the file manager in your control panel. In the www/ directory, click on "Create Directory". You can name the folder "wordpress", for example. The path of your WordPress installation would then be www/wordpress/. "www" is the root directory, "wordpress" is the subdirectory you just created.
Next, install WordPress as described above. If you are using the software installer, select www/wordpress/ as the installation path so that the WordPress software is installed in this subdirectory. If you are installing WordPress manually, simply drag the WordPress installation files into the directory www/wordpress/.
You will then need to make sure that the subdirectory does not appear in your URL. We will explain how to do this in the next step.
Displaying the URL without the Subdirectory
You need to make some settings to make your site accessible without the directory name in the URL. Otherwise, the subdirectory where you installed WordPress will appear in the URL, like this: www.yourdomain.tld/wordpress/
Usually the site should be accessible without the subdirectory in the URL: www.yourdomain.tld
Go to the File Manager in the Control Panel and navigate to the folder where you saved the WordPress files. In our example, this is the folder called "wordpress" with the following file path: www/wordpress/.
Download the files named "index.php" and ".htaccess" (right click -> "Download" -> "Save file"). Make sure that you save them and do not temporarily load them with the "Open With" selection. Alternatively, you can download the files using FTP.
Open index.php in a text editor such as Notepad++, Atom or the Windows editor. These will not alter the source code through automatic formatting (which can happen with Microsoft Word, for example).
Now adjust the path of the WordPress installation by adding the name of the subdirectory with the prefix "/" before "/wp-blog-header.php".
In our example the name of the subdirectory would be "wordpress".
Then upload the two files (the .htaccess and the index.php you just changed) into the main directory ("www").
Do not delete the two old files in the subdirectory ("wordpress"). Just leave them unchanged in the subdirectory.
In order for WordPress to adopt the new settings, you need to log in to the WordPress backend and change the "Website address (URL)" in the settings under "General".
To do this, delete the subdirectory (after the /). Don't remove the subdirectory for "WordPress address (URL)".
Your website is now accessible under your domain without the subdirectory.
First Steps after Installation
Congratulations! Your new WordPress website is now ready for use. To help you get started, we'll walk you through a few steps with useful configurations.
Change URL Structure to increase Usability
One of the first things to do is change the permalink structure.
You can change the URLs by default, by example from:
alldomains.hosting/?p=12345
To:
alldomains.hosting/how-to-install-wordpress.html
The subpages of your website are then much easier for visitors to access. In addition, meaningful URLs have a positive influence on your Google rankings.
If you do this setting right away, you will save yourself the manual effort of setting up redirects later.
To change the permalinks, go to "Permalinks" in the settings and select the desired URL format. We recommend "post name".
Delete pre-installed Plugins to increase Security
You can delete any pre-installed plugins you don't need. By default, WordPress comes with Akismet Anti-Spam and Hello Dolly. You can delete both of them.
This will remove potential security vulnerabilities from your site. Also, the default version of the Akismet Anti-Spam plugin is not GDPR compliant.
Go to the "Plugins" tab -> "Installed Plugins" and delete the plugins.
Activate Maintenance Mode until your Website is ready for the World
Before you have finished designing your website, you should activate maintenance mode. This way you can inform visitors that your website is under construction and will be available soon.
The easiest way to do this is to use a plugin such as Maintenance.